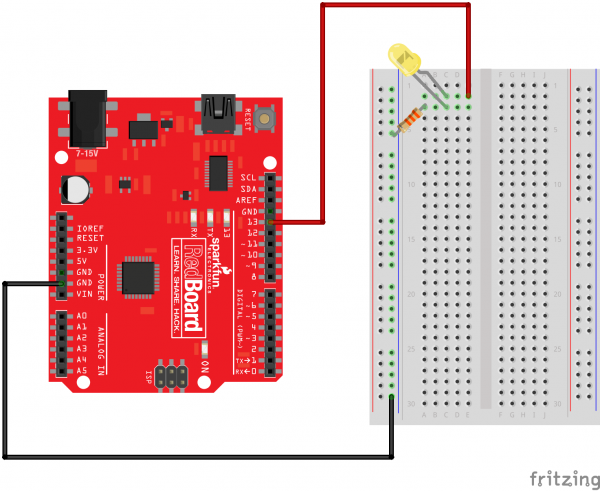
void setup()
{
pinMode(13, OUTPUT);
}
void loop()
{
digitalWrite(13, HIGH); // Turn on the LED
delay(500); //Wait for half a second
digitalWrite(13, LOW); // Turn off the LED
delay(500); //Wait for half a second
}

Task 2
void setup()
{
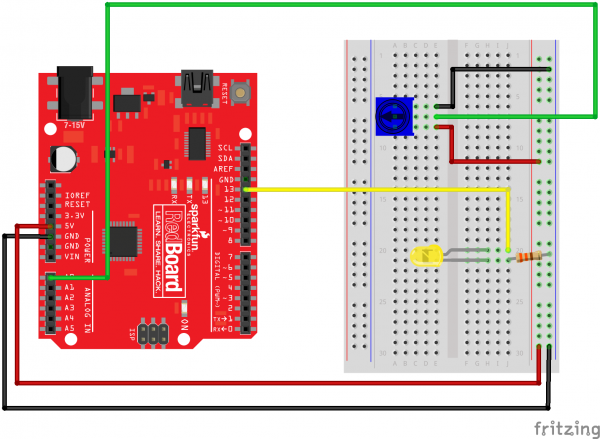
pinMode(ledPin, OUTPUT);
}
void loop()
{
int sensorValue;
sensorValue = analogRead(sensorPin) * 2; // now it returns value between 0 - 2046
digitalWrite(ledPin, HIGH); // Turn the LED on
delay(sensorValue); // Pause for sensorValue
digitalWrite(ledPin, LOW); // Turn the LED off
delay(sensorValue); // Pause for sensorValue
}

Task 3
int DISPLAY_TIME = 100; // In milliseconds
void setup()
{
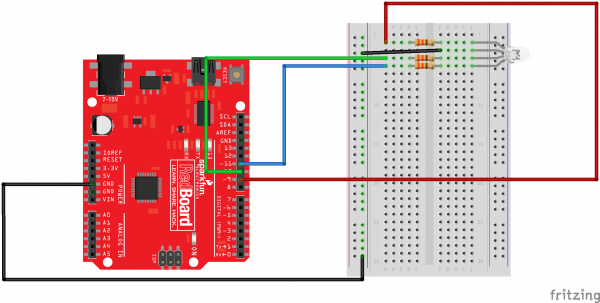
pinMode(RED_PIN, OUTPUT);
pinMode(GREEN_PIN, OUTPUT);
pinMode(BLUE_PIN, OUTPUT);
}
void loop()
{
mainColors();
showSpectrum();
}
void mainColors()
{
// Off (all LEDs off):
digitalWrite(RED_PIN, LOW);
digitalWrite(GREEN_PIN, LOW);
digitalWrite(BLUE_PIN, LOW);
delay(1000);
// Red (turn just the red LED on):
digitalWrite(RED_PIN, HIGH);
digitalWrite(GREEN_PIN, LOW);
digitalWrite(BLUE_PIN, LOW);
delay(1000);
// Green (turn just the green LED on):
digitalWrite(RED_PIN, LOW);
digitalWrite(GREEN_PIN, HIGH);
digitalWrite(BLUE_PIN, LOW);
delay(1000);
// Blue (turn just the blue LED on):
digitalWrite(RED_PIN, LOW);
digitalWrite(GREEN_PIN, LOW);
digitalWrite(BLUE_PIN, HIGH);
delay(1000);
// Yellow (turn red and green on):
digitalWrite(RED_PIN, HIGH);
digitalWrite(GREEN_PIN, HIGH);
digitalWrite(BLUE_PIN, LOW);
delay(1000);
// Cyan (turn green and blue on):
digitalWrite(RED_PIN, LOW);
digitalWrite(GREEN_PIN, HIGH);
digitalWrite(BLUE_PIN, HIGH);
delay(1000);
// Purple (turn red and blue on):
digitalWrite(RED_PIN, HIGH);
digitalWrite(GREEN_PIN, LOW);
digitalWrite(BLUE_PIN, HIGH);
delay(1000);
// White (turn all the LEDs on):
digitalWrite(RED_PIN, HIGH);
digitalWrite(GREEN_PIN, HIGH);
digitalWrite(BLUE_PIN, HIGH);
delay(1000);
}
void showSpectrum()
{
int x; // define an integer variable called "x"
for (x = 0; x < 768; x++)
{
showRGB(x); // Call RGBspectrum() with our new x
delay(10); // Delay for 10 ms (1/100th of a second)
}
}
void showRGB(int color)
{
int redIntensity;
int greenIntensity;
int blueIntensity;
if (color <= 255) // zone 1
{
redIntensity = 255 - color; // red goes from on to off
greenIntensity = color; // green goes from off to on
blueIntensity = 0; // blue is always off
}
else if (color <= 511) // zone 2
{
redIntensity = 0; // red is always off
greenIntensity = 255 - (color - 256); // green on to off
blueIntensity = (color - 256); // blue off to on
}
else // color >= 512 // zone 3
{
redIntensity = (color - 512); // red off to on
greenIntensity = 0; // green is always off
blueIntensity = 255 - (color - 512); // blue on to off
}
// Now that the brightness values have been set, command the LED
// to those values
analogWrite(RED_PIN, redIntensity);
analogWrite(BLUE_PIN, blueIntensity);
analogWrite(GREEN_PIN, greenIntensity);
}
void showSpectrum2()
{
int x; // define an integer variable called "x"
for (x = 0; x < 768; x++)
// Each time we loop (with a new value of x), do the following:
{
showRGB(x); // Call RGBspectrum() with our new x
delay(10); // Delay for 10 ms (1/100th of a second)
}
// now reverse the loop
for (x = 768; x > 768; x--)
{
showRGB(x); // Call RGBspectrum() with our new x
delay(10); // Delay for 10 ms (1/100th of a second)
}
}

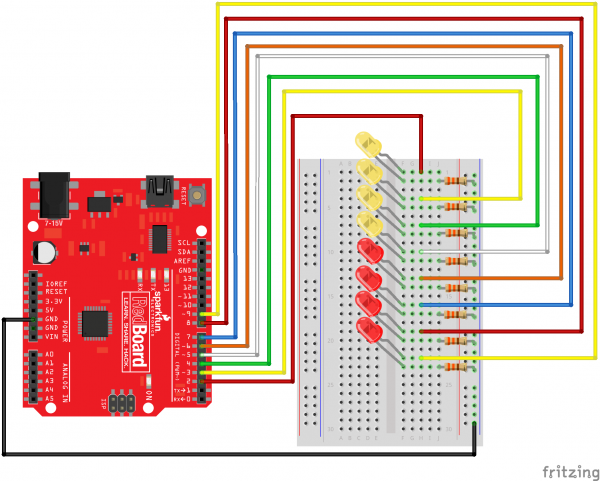
Task 4
// To keep track of all the LED pins, we'll use an "array".
// An array lets you store a group of variables, and refer to them
// by their position, or "index". Here we're creating an array of
// eight integers, and initializing them to a set of values:
int ledPins[] = {2,3,4,5,6,7,8,9};
// The first element of an array is index 0.
// We've put the value "2" in index 0, "3" in index 1, etc.
// The final index in the above array is 7, which contains
// the value "9".
// We're using the values in this array to specify the pin numbers
// that the eight LEDs are connected to. LED 0 is connected to
// pin 2, LED 1 is connected to pin 3, etc.
void setup()
{
int index;
// In this sketch, we'll use "for() loops" to step variables from
// one value to another, and perform a set of instructions for
// each step. For() loops are a very handy way to get numbers to
// count up or down.
// Every for() loop has three statements separated by
// semicolons (;):
// 1. Something to do before starting
// 2. A test to perform; as long as it's true, keep looping
// 3. Something to do after each loop (increase a variable)
// For the for() loop below, these are the three statements:
// 1. index = 0; Before starting, make index = 0.
// 2. index <= 7; If index is less or equal to 7,
// run the following code.
// (When index = 8, continue with the sketch.)
// 3. index++ Putting "++" after a variable means
// "add one to it".
// (You can also use "index = index + 1".)
// Every time you go through the loop, the statements following
// the for() (within the brackets) will run.
// When the test in statement 2 is finally false, the sketch
// will continue.
// Here we'll use a for() loop to initialize all the LED pins
// to outputs. This is much easier than writing eight separate
// statements to do the same thing.
// This for() loop will make index = 0, then run the pinMode()
// statement within the brackets. It will then do the same thing
// for index = 2, index = 3, etc. all the way to index = 7.
for(index = 0; index <= 7; index++)
{
pinMode(ledPins[index],OUTPUT);
// ledPins[index] is replaced by the value in the array.
// For example, ledPins[0] is 2
}
}
void loop()
{
// This loop() calls functions that we've written further below.
// We've disabled some of these by commenting them out (putting
// "//" in front of them). To try different LED displays, remove
// the "//" in front of the ones you'd like to run, and add "//"
// in front of those you don't to comment out (and disable) those
// lines.
oneAfterAnotherNoLoop(); // Light up all the LEDs in turn
//oneAfterAnotherLoop(); // Same as oneAfterAnotherNoLoop,
// but with much less typing
//oneOnAtATime(); // Turn on one LED at a time,
// scrolling down the line
//pingPong(); // Light the LEDs middle to the edges
//marquee(); // Chase lights like you see on signs
//randomLED(); // Blink LEDs randomly
}
/*
oneAfterAnotherNoLoop()
This function will light one LED, delay for delayTime, then light
the next LED, and repeat until all the LEDs are on. It will then
turn them off in the reverse order.
This function does NOT use a for() loop. We've done it the hard way
to show you how much easier life can be when you use for() loops.
Take a look at oneAfterAnotherLoop() further down, which does
exactly the same thing with much less typing.
*/
void oneAfterAnotherNoLoop()
{
int delayTime = 100; // time (milliseconds) to pause between LEDs
// make this smaller for faster switching
// turn all the LEDs on:
digitalWrite(ledPins[0], HIGH); //Turns on LED #0 (pin 2)
delay(delayTime); //wait delayTime milliseconds
digitalWrite(ledPins[1], HIGH); //Turns on LED #1 (pin 3)
delay(delayTime); //wait delayTime milliseconds
digitalWrite(ledPins[2], HIGH); //Turns on LED #2 (pin 4)
delay(delayTime); //wait delayTime milliseconds
digitalWrite(ledPins[3], HIGH); //Turns on LED #3 (pin 5)
delay(delayTime); //wait delayTime milliseconds
digitalWrite(ledPins[4], HIGH); //Turns on LED #4 (pin 6)
delay(delayTime); //wait delayTime milliseconds
digitalWrite(ledPins[5], HIGH); //Turns on LED #5 (pin 7)
delay(delayTime); //wait delayTime milliseconds
digitalWrite(ledPins[6], HIGH); //Turns on LED #6 (pin 8)
delay(delayTime); //wait delayTime milliseconds
digitalWrite(ledPins[7], HIGH); //Turns on LED #7 (pin 9)
delay(delayTime); //wait delayTime milliseconds
// turn all the LEDs off:
digitalWrite(ledPins[7], LOW); //Turn off LED #7 (pin 9)
delay(delayTime); //wait delayTime milliseconds
digitalWrite(ledPins[6], LOW); //Turn off LED #6 (pin 8)
delay(delayTime); //wait delayTime milliseconds
digitalWrite(ledPins[5], LOW); //Turn off LED #5 (pin 7)
delay(delayTime); //wait delayTime milliseconds
digitalWrite(ledPins[4], LOW); //Turn off LED #4 (pin 6)
delay(delayTime); //wait delayTime milliseconds
digitalWrite(ledPins[3], LOW); //Turn off LED #3 (pin 5)
delay(delayTime); //wait delayTime milliseconds
digitalWrite(ledPins[2], LOW); //Turn off LED #2 (pin 4)
delay(delayTime); //wait delayTime milliseconds
digitalWrite(ledPins[1], LOW); //Turn off LED #1 (pin 3)
delay(delayTime); //wait delayTime milliseconds
digitalWrite(ledPins[0], LOW); //Turn off LED #0 (pin 2)
delay(delayTime); //wait delayTime milliseconds
}
/*
oneAfterAnotherLoop()
This function does exactly the same thing as oneAfterAnotherNoLoop(),
but it takes advantage of for() loops and the array to do it with
much less typing.
*/
void oneAfterAnotherLoop()
{
int index;
int delayTime = 100; // milliseconds to pause between LEDs
// make this smaller for faster switching
// Turn all the LEDs on:
// This for() loop will step index from 0 to 7
// (putting "++" after a variable means add one to it)
// and will then use digitalWrite() to turn that LED on.
for(index = 0; index <= 7; index++)
{
digitalWrite(ledPins[index], HIGH);
delay(delayTime);
}
// Turn all the LEDs off:
// This for() loop will step index from 7 to 0
// (putting "--" after a variable means subtract one from it)
// and will then use digitalWrite() to turn that LED off.
for(index = 7; index >= 0; index--)
{
digitalWrite(ledPins[index], LOW);
delay(delayTime);
}
}
/*
oneOnAtATime()
This function will step through the LEDs,
lighting only one at at time.
*/
void oneOnAtATime()
{
int index;
int delayTime = 100; // milliseconds to pause between LEDs
// make this smaller for faster switching
// step through the LEDs, from 0 to 7
for(index = 0; index <= 7; index++)
{
digitalWrite(ledPins[index], HIGH); // turn LED on
delay(delayTime); // pause to slow down
digitalWrite(ledPins[index], LOW); // turn LED off
}
}
/*
pingPong()
This function will step through the LEDs,
lighting one at at time in both directions.
*/
void pingPong()
{
int index;
int delayTime = 100; // milliseconds to pause between LEDs
// make this smaller for faster switching
// step through the LEDs, from 0 to 7
for(index = 0; index <= 7; index++)
{
digitalWrite(ledPins[index], HIGH); // turn LED on
delay(delayTime); // pause to slow down
digitalWrite(ledPins[index], LOW); // turn LED off
}
// step through the LEDs, from 7 to 0
for(index = 7; index >= 0; index--)
{
digitalWrite(ledPins[index], HIGH); // turn LED on
delay(delayTime); // pause to slow down
digitalWrite(ledPins[index], LOW); // turn LED off
}
}
/*
marquee()
This function will mimic "chase lights" like those around signs.
*/
void marquee()
{
int index;
int delayTime = 200; // milliseconds to pause between LEDs
// Make this smaller for faster switching
// Step through the first four LEDs
// (We'll light up one in the lower 4 and one in the upper 4)
for(index = 0; index <= 3; index++) // Step from 0 to 3
{
digitalWrite(ledPins[index], HIGH); // Turn a LED on
digitalWrite(ledPins[index+4], HIGH); // Skip four, and turn that LED on
delay(delayTime); // Pause to slow down the sequence
digitalWrite(ledPins[index], LOW); // Turn the LED off
digitalWrite(ledPins[index+4], LOW); // Skip four, and turn that LED off
}
}
/*
randomLED()
This function will turn on random LEDs. Can you modify it so it
also lights them for random times?
*/
void randomLED()
{
int index;
int delayTime;
index = random(8); // pick a random number between 0 and 7
delayTime = 100;
digitalWrite(ledPins[index], HIGH); // turn LED on
delay(delayTime); // pause to slow down
digitalWrite(ledPins[index], LOW); // turn LED off
}
void oneAfterAnotherLoop2()
{
int index;
int delayTime = 100; // milliseconds to pause between LEDs
// make this smaller for faster switching
// Turn all the LEDs on:
// This for() loop will step index from 0 to 7
// (putting "++" after a variable means add one to it)
// and will then use digitalWrite() to turn that LED on.
for(index = 0; index <= 7; index++)
{
digitalWrite(ledPins[index], HIGH);
delay(delayTime);
}
// Turn all the LEDs off:
// This for() loop will step index from 7 to 0
// (putting "--" after a variable means subtract one from it)
// and will then use digitalWrite() to turn that LED off.
for(index = 7; index >= 0; index--)
{
digitalWrite(ledPins[index], LOW);
delay(delayTime);
}
// Reverse loops:
// This is exactly the same as the above code, but starts from
// the opposite end
for(index = 7; index >= 0; index--)
{
digitalWrite(ledPins[index], HIGH);
delay(delayTime);
}
for(index = 0; index <= 7; index++)
{
digitalWrite(ledPins[index], LOW);
delay(delayTime);
}
}

Task 5
// First we'll set up constants for the pin numbers.
// This will make it easier to follow the code below.
const int button1Pin = 2; // pushbutton 1 pin
const int button2Pin = 3; // pushbutton 2 pin
const int ledPin = 13; // LED pin
void setup()
{
// Set up the pushbutton pins to be an input:
pinMode(button1Pin, INPUT);
pinMode(button2Pin, INPUT);
// Set up the LED pin to be an output:
pinMode(ledPin, OUTPUT);
}
void loop()
{
int button1State, button2State; // variables to hold the pushbutton states
// Since a pushbutton has only two states (pushed or not pushed),
// we've run them into digital inputs. To read an input, we'll
// use the digitalRead() function. This function takes one
// parameter, the pin number, and returns either HIGH (5V)
// or LOW (GND).
// Here we'll read the current pushbutton states into
// two variables:
button1State = digitalRead(button1Pin);
button2State = digitalRead(button2Pin);
// this new code uses only one button, and acts like a light switch
bool power; // false = off, true = on.
if (button1State == LOW) // if button is pressed
{
power = ! power // toggle the power
}
if (power) // if power is on
{
digitalWrite(ledPin, HIGH); // turn the LED on
}
else // if power is off
{
digitalWrite(ledPin, LOW); // turn the LED off
}
{
digitalWrite(ledPin, HIGH); // turn the LED on
}
else
{
digitalWrite(ledPin, LOW); // turn the LED off
}
// As you can see, logic operators can be combined to make
// complex decisions!
// Don't forget that we use = when we're assigning a value,
// and use == when we're testing a value for equivalence.
}


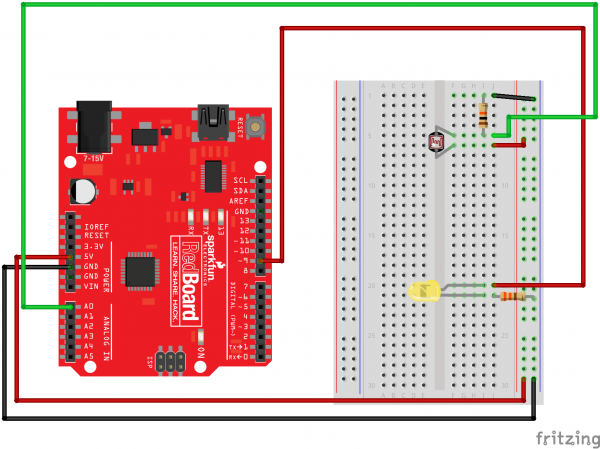
Task 6
// As usual, we'll create constants to name the pins we're using.
// This will make it easier to follow the code below.
const int sensorPin1 = 0; // this code includes 3 photoresistors and 3 LEDs, to include some variation
const int sensorPin2 = 1;
const int sensorPin3 = 2;
const int ledPin1 = 9;
const int ledPin2 = 10;
const int ledPin3 = 11;
// We'll also set up some global variables for the light level:
int lightLevel, high = 0, low = 1023;
void setup()
{
// We'll set up the LED pin to be an output.
// (We don't need to do anything special to use the analog input.)
pinMode(ledPin, OUTPUT);
}
void loop()
{
// Just as we've done in the past, we'll use the analogRead()
// function to measure the voltage coming from the photoresistor
// resistor pair. This number can range between 0 (0 Volts) and
// 1023 (5 Volts), but this circuit will have a smaller range
// between dark and light.
lightLevel = analogRead(sensorPin);
// We now want to use this number to control the brightness of
// the LED. But we have a problem: the analogRead() function
// returns values between 0 and 1023, and the analogWrite()
// function wants values from 0 to 255.
// We can solve this by using two handy functions called map()
// and constrain(). Map will change one range of values into
// another range. If we tell map() our "from" range is 0-1023,
// and our "to" range is 0-255, map() will squeeze the larger
// range into the smaller. (It can do this for any two ranges.)
// lightLevel = map(lightLevel, 0, 1023, 0, 255);
// Because map() could still return numbers outside the "to"
// range, (if they're outside the "from" range), we'll also use
// a function called constrain() that will "clip" numbers into
// a given range. If the number is above the range, it will reset
// it to be the highest number in the range. If the number is
// below the range, it will reset it to the lowest number.
// If the number is within the range, it will stay the same.
// lightLevel = constrain(lightLevel, 0, 255);
// Here's one last thing to think about. The circuit we made
// won't have a range all the way from 0 to 5 Volts. It will
// be a smaller range, such as 300 (dark) to 800 (light).
// If we just pass this number directly to map(), the LED will
// change brightness, but it will never be completely off or
// completely on.
// You can fix this two ways, each of which we'll show
// in the functions below. Uncomment ONE of them to
// try it out:
manualTune(); // manually change the range from light to dark
//autoTune(); // have the Arduino do the work for us!
// The above functions will alter lightLevel to be cover the
// range from full-on to full-off. Now we can adjust the
// brightness of the LED:
analogWrite(ledPin, lightLevel);
// The above statement will brighten the LED along with the
// light level. To do the opposite, replace "lightLevel" in the
// above analogWrite() statement with "255-lightLevel".
// Now you've created a night-light!
}
void manualTune()
{
// As we mentioned above, the light-sensing circuit we built
// won't have a range all the way from 0 to 1023. It will likely
// be more like 300 (dark) to 800 (light). If you run this sketch
// as-is, the LED won't fully turn off, even in the dark.
// You can accommodate the reduced range by manually
// tweaking the "from" range numbers in the map() function.
// Here we're using the full range of 0 to 1023.
// Try manually changing this to a smaller range (300 to 800
// is a good guess), and try it out again. If the LED doesn't
// go completely out, make the low number larger. If the LED
// is always too bright, make the high number smaller.
// Remember you're JUST changing the 0, 1023 in the line below!
lightLevel = map(lightLevel, 0, 1023, 0, 255);
lightLevel = constrain(lightLevel, 0, 255);
// Now we'll return to the main loop(), and send lightLevel
// to the LED.
}
void autoTune()
{
// As we mentioned above, the light-sensing circuit we built
// won't have a range all the way from 0 to 1023. It will likely
// be more like 300 (dark) to 800 (light).
// In the manualTune() function above, you need to repeatedly
// change the values and try the program again until it works.
// But why should you have to do that work? You've got a
// computer in your hands that can figure things out for itself!
// In this function, the Arduino will keep track of the highest
// and lowest values that we're reading from analogRead().
// If you look at the top of the sketch, you'll see that we've
// initialized "low" to be 1023. We'll save anything we read
// that's lower than that:
if (lightLevel < low)
{
low = lightLevel;
}
// We also initialized "high" to be 0. We'll save anything
// we read that's higher than that:
if (lightLevel > high)
{
high = lightLevel;
}
// Once we have the highest and lowest values, we can stick them
// directly into the map() function. No manual tweaking needed!
// One trick we'll do is to add a small offset to low and high,
// to ensure that the LED is fully-off and fully-on at the limits
// (otherwise it might flicker a little bit).
lightLevel = map(lightLevel, low+30, high-30, 0, 255);
lightLevel = constrain(lightLevel, 0, 255);
// Now we'll return to the main loop(), and send lightLevel
// to the LED.
}

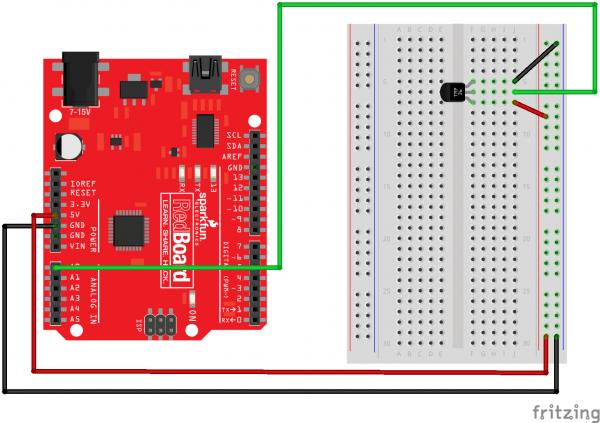
Task 7
// We'll use analog input 0 to measure the temperature sensor's
// signal pin.
const int temperaturePin = 0;
void setup()
{
// In this sketch, we'll use the Arduino's serial port
// to send text back to the main computer. For both sides to
// communicate properly, they need to be set to the same speed.
// We use the Serial.begin() function to initialize the port
// and set the communications speed.
// The speed is measured in bits per second, also known as
// "baud rate". 9600 is a very commonly used baud rate,
// and will transfer about 10 characters per second.
Serial.begin(9600);
}
void loop()
{
// Up to now we've only used integer ("int") values in our
// sketches. Integers are always whole numbers (0, 1, 23, etc.).
// In this sketch, we'll use floating-point values ("float").
// Floats can be fractional numbers such as 1.42, 2523.43121, etc.
// We'll declare three floating-point variables
// (We can declare multiple variables of the same type on one line:)
float voltage, degreesC, degreesF;
// First we'll measure the voltage at the analog pin. Normally
// we'd use analogRead(), which returns a number from 0 to 1023.
// Here we've written a function (further down) called
// getVoltage() that returns the true voltage (0 to 5 Volts)
// present on an analog input pin.
voltage = getVoltage(temperaturePin);
// Now we'll convert the voltage to degrees Celsius.
// This formula comes from the temperature sensor datasheet:
degreesC = (voltage - 0.5) * 100.0;
// While we're at it, let's convert degrees Celsius to Fahrenheit.
// This is the classic C to F conversion formula:
degreesF = degreesC * (9.0/5.0) + 32.0;
// Now we'll use the serial port to print these values
// to the serial monitor!
// To open the serial monitor window, upload your code,
// then click the "magnifying glass" button at the right edge
// of the Arduino IDE toolbar. The serial monitor window
// will open.
// (NOTE: remember we said that the communication speed
// must be the same on both sides. Ensure that the baud rate
// control at the bottom of the window is set to 9600. If it
// isn't, change it to 9600.)
// Also note that every time you upload a new sketch to the
// Arduino, the serial monitor window will close. It does this
// because the serial port is also used to upload code!
// When the upload is complete, you can re-open the serial
// monitor window.
// To send data from the Arduino to the serial monitor window,
// we use the Serial.print() function. You can print variables
// or text (within quotes).
Serial.print("voltage: ");
Serial.print(voltage);
Serial.print(" deg C: ");
Serial.print(degreesC);
Serial.print(" deg F: ");
Serial.println(degreesF);
// These statements will print lines of data like this:
// "voltage: 0.73 deg C: 22.75 deg F: 72.96"
if(degreesC > 25 || degreesC < 20) // turn the LED on if temperature is too high/low
{
digitalWrite(13, HIGH)
}
// Note that all of the above statements are "print", except
// for the last one, which is "println". "Print" will output
// text to the SAME LINE, similar to building a sentence
// out of words. "Println" will insert a "carriage return"
// character at the end of whatever it prints, moving down
// to the NEXT line.
delay(1000); // repeat once per second (change as you wish!)
}
float getVoltage(int pin)
{
// This function has one input parameter, the analog pin number
// to read. You might notice that this function does not have
// "void" in front of it; this is because it returns a floating-
// point value, which is the true voltage on that pin (0 to 5V).
// You can write your own functions that take in parameters
// and return values. Here's how:
// To take in parameters, put their type and name in the
// parenthesis after the function name (see above). You can
// have multiple parameters, separated with commas.
// To return a value, put the type BEFORE the function name
// (see "float", above), and use a return() statement in your code
// to actually return the value (see below).
// If you don't need to get any parameters, you can just put
// "()" after the function name.
// If you don't need to return a value, just write "void" before
// the function name.
// Here's the return statement for this function. We're doing
// all the math we need to do within this statement:
return (analogRead(pin) * 0.004882814);
// This equation converts the 0 to 1023 value that analogRead()
// returns, into a 0.0 to 5.0 value that is the true voltage
// being read at that pin.
}
// Other things to try with this code:
// Turn on an LED if the temperature is above or below a value.
// Read that threshold value from a potentiometer - now you've
// created a thermostat!

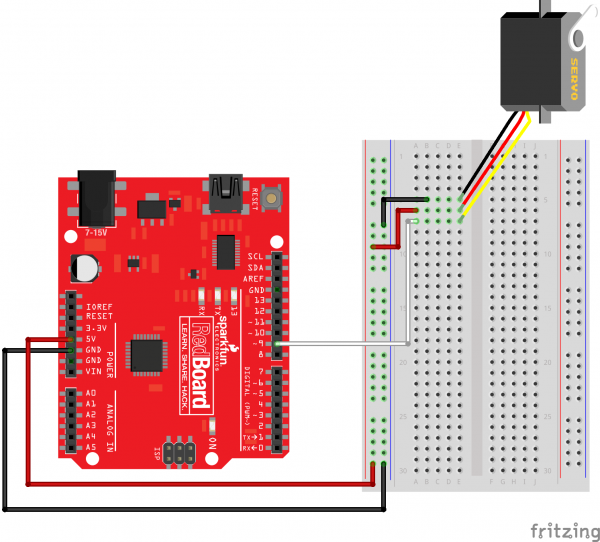
Task 8
// If we had to write a sketch to control a servo from scratch,
// it would be a lot of work. Fortunately, others have done the
// hard work for you. We're going to include a "library"
// that has the functions needed to drive servos.
// A library is an set of additional functions you can add to
// your sketch. Numerous libraries are available for many uses,
// see http://arduino.cc/en/Reference/Libraries for information
// on the standard libraries, and Google for others. When you're
// using a new part, chances are someone has written a library
// for it.
#include <Servo.h> // servo library
// Once you "include" a library, you'll have access to those
// functions. You can find a list of the functions in the servo
// library at: http://arduino.cc/en/Reference/Servo
// Most libraries also have example sketches you can load from
// the "file/examples" menu.
// Now we'll create a servo "object", called myservo. You should
// create one of these for each servo you want to control.
// You can control a maximum of twelve servos on the Uno
// using this library. (Other servo libraries may let you
// control more). Note that this library disables PWM on
// pins 9 and 10!
Servo servo1; // servo control object
void setup()
{
// We'll now "attach" the servo1 object to digital pin 9.
// If you want to control more than one servo, attach more
// servo objects to the desired pins (must be digital).
// Attach tells the Arduino to begin sending control signals
// to the servo. Servos require a continuous stream of control
// signals, even if you're not currently moving them.
// While the servo is being controlled, it will hold its
// current position with some force. If you ever want to
// release the servo (allowing it to be turned by hand),
// you can call servo1.detach().
servo1.attach(9);
}
void loop()
{
int position;
// To control a servo, you give it the angle you'd like it
// to turn to. Servos cannot turn a full 360 degrees, but you
// can tell it to move anywhere between 0 and 180 degrees.
// Change position at full speed:
servo1.write(180); // Tell servo to go to 180 degrees
delay(500); // Pause to get it time to move
servo1.write(0); // Tell servo to go to 0 degrees
delay(500); // Pause to get it time to move
// Change position at a slower speed:
// To slow down the servo's motion, we'll use a for() loop
// to give it a bunch of intermediate positions, with 20ms
// delays between them. You can change the step size to make
// the servo slow down or speed up. Note that the servo can't
// move faster than its full speed, and you won't be able
// to update it any faster than every 20ms.
// Tell servo to go to 180 degrees, stepping by two degrees
for(position = 0; position < 180; position += 2)
{
servo1.write(position); // Move to next position
delay(20); // Short pause to allow it to move
}
// Tell servo to go to 0 degrees, stepping by one degree
for(position = 180; position >= 0; position -= 1)
{
servo1.write(position); // Move to next position
delay(20); // Short pause to allow it to move
}
}

Task 9
// Include the servo library to add servo-control functions:
#include <Servo.h>
// Create a servo "object", called servo1. Each servo object
// controls one servo (you can have a maximum of 12):
Servo servo1;
// Define the analog input pin to measure flex sensor position:
const int flexpin = 0;
void setup()
{
// Use the serial monitor window to help debug our sketch:
Serial.begin(9600);
// Enable control of a servo on pin 9:
servo1.attach(9);
}
void loop()
{
int flexposition; // Input value from the analog pin.
int servoposition; // Output value to the servo.
// Read the position of the flex sensor (0 to 1023):
flexposition = analogRead(flexpin);
// Because the voltage divider circuit only returns a portion
// of the 0-1023 range of analogRead(), we'll map() that range
// to the servo's range of 0 to 180 degrees. The flex sensors
// we use are usually in the 600-900 range:
servoposition = map(flexposition, 600, 900, 0, 180);
servoposition = constrain(servoposition, 0, 90); //altered the constraint of the servo to half it's potential
// Now we'll command the servo to move to that position:
servo1.write(servoposition);
// Because every flex sensor has a slightly different resistance,
// the 600-900 range may not exactly cover the flex sensor's
// output. To help tune our program, we'll use the serial port to
// print out our values to the serial monitor window:
Serial.print("sensor: ");
Serial.print(flexposition);
Serial.print(" servo: ");
Serial.println(servoposition);
// Note that all of the above lines are "print" except for the
// last line which is "println". This puts everything on the
// same line, then sends a final carriage return to move to
// the next line.
// After you upload the sketch, turn on the serial monitor
// (the magnifying-glass icon to the right of the icon bar).
// You'll be able to see the sensor values. Bend the flex sensor
// and note its minimum and maximum values. If you replace the
// 600 and 900 in the map() function above, you'll exactly match
// the flex sensor's range with the servo's range.
delay(20); // wait 20ms between servo updates
}


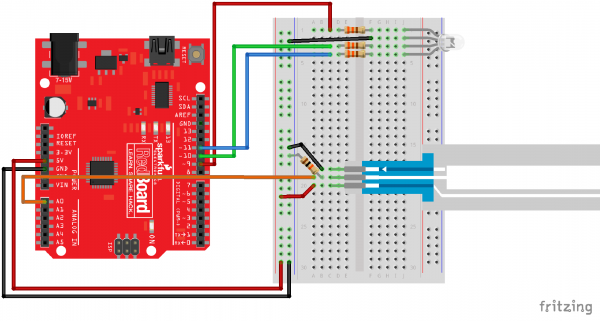
Task 10
// Constants for LED connections (note that these must be
// PWM pins, which are marked with "PWM" or have a "~" symbol
// next to them on the board).
const int RED_LED_PIN = 9; // Red LED Pin
const int GREEN_LED_PIN = 10; // Green LED Pin
const int BLUE_LED_PIN = 11; // Blue LED Pin
const int SENSOR_PIN = 0; // Analog input pin
// Global PWM brightness values for the RGB LED.
// These are global so both loop() and setRGB() can see them.
int redValue, greenValue, blueValue;
void setup()
{
// No need for any code here
// analogWrite() sets up the pins as outputs
}
void loop()
{
int sensorValue;
// Read the voltage from the softpot (0-1023)
sensorValue = analogRead(0);
// We've written a new function called setRGB() (further down
// in the sketch) that decodes sensorValue into a position
// on the RGB "rainbow", and sets the RGB LED to that color.
setRGB(sensorValue);
}
// setRGB()
// Set a RGB LED to a position on the "rainbow" of all colors.
// RGBposition should be in the range of 0 to 1023 (such as
// from an analog input).
void setRGB(int RGBposition)
{
int mapRGB1, mapRGB2, constrained1, constrained2;
// Here we take RGBposition and turn it into three RGB values.
// The three values are computed so that the colors mix and
// produce a rainbow of colors across the 0-1023 input range.
// For each channel (red green blue), we're creating a "peak"
// a third of the way along the 0-1023 range. By overlapping
// these peaks with each other, the colors are mixed together.
// This is most easily shown with a diagram:
// http://sfecdn.s3.amazonaws.com/education/SIK/SchematicImages/Misc/RGB_function.jpg
// Create the red peak, which is centered at 0.
// (Because it's centered at 0, half is after 0, and half
// is before 1023):
mapRGB1 = map(RGBposition, 0, 341, 255, 0);
constrained1 = constrain(mapRGB1, 0, 255);
mapRGB2 = map(RGBposition, 682, 1023, 0, 255);
constrained2 = constrain(mapRGB2, 0, 255);
blueValue = constrained1 + constrained2; //swapped the red and blue values, it should have a different output
// Create the green peak, which is centered at 341
// (one-third of the way to 1023):
// Note that we've nested the functions by putting the map()
// function inside the constrain() function. This can make your
// code more compact, and requires fewer variabls:
greenValue = constrain(map(RGBposition, 0, 341, 0, 255), 0, 255)
- constrain(map(RGBposition, 341, 682, 0,255), 0, 255);
// Create the blue peak, which is centered at 682
// (two-thirds of the way to 1023):
redValue = constrain(map(RGBposition, 341, 682, 0, 255), 0, 255)
- constrain(map(RGBposition, 682, 1023, 0, 255), 0, 255); //swapped the red and blue values, it should have a different output
// Now we have all three brightnesses,
// we just need to display the computed color:
analogWrite(RED_LED_PIN, redValue);
analogWrite(GREEN_LED_PIN, greenValue);
analogWrite(BLUE_LED_PIN, blueValue);
// Feel free to use this function in your own code!
}

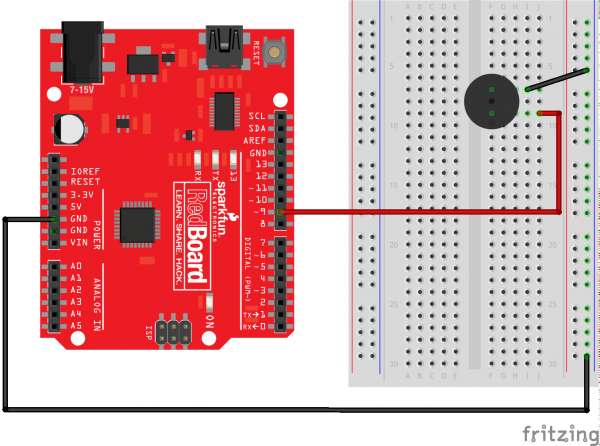
Task 11
/*
This sketch uses the buzzer to play songs.
The Arduino's tone() command will play notes of a given frequency.
We'll provide a function that takes in note characters (a-g),
and returns the corresponding frequency from this table:
note frequency
c 262 Hz
d 294 Hz
e 330 Hz
f 349 Hz
g 392 Hz
a 440 Hz
b 494 Hz
C 523 Hz
For more information, see http://arduino.cc/en/Tutorial/Tone
*/
const int buzzerPin = 9;
// We'll set up an array with the notes we want to play
// change these values to make different songs!
// Length must equal the total number of notes and spaces
const int songLength = 18;
// Notes is an array of text characters corresponding to the notes
// in your song. A space represents a rest (no tone)
char notes[] = "cdfda ag cdfdg gf "; // a space represents a rest
// Beats is an array of values for each note and rest.
// A "1" represents a quarter-note, 2 a half-note, etc.
// Don't forget that the rests (spaces) need a length as well.
int beats[] = {1,1,1,1,1,1,4,4,2,1,1,1,1,1,1,4,4,2};
// The tempo is how fast to play the song.
// To make the song play faster, decrease this value.
int tempo = 200; //increased the tempo of the song to 200 beats per minute (bpm)
void setup()
{
pinMode(buzzerPin, OUTPUT);
}
void loop()
{
int i, duration;
for (i = 0; i < songLength; i++) // step through the song arrays
{
duration = beats[i] * tempo; // length of note/rest in ms
if (notes[i] == ' ') // is this a rest?
{
delay(duration); // then pause for a moment
}
else // otherwise, play the note
{
tone(buzzerPin, frequency(notes[i]), duration);
delay(duration); // wait for tone to finish
}
delay(tempo/10); // brief pause between notes
}
// We only want to play the song once, so we'll pause forever:
while(true){}
// If you'd like your song to play over and over,
// remove the above statement
}
int frequency(char note)
{
// This function takes a note character (a-g), and returns the
// corresponding frequency in Hz for the tone() function.
int i;
const int numNotes = 8; // number of notes we're storing
// The following arrays hold the note characters and their
// corresponding frequencies. The last "C" note is uppercase
// to separate it from the first lowercase "c". If you want to
// add more notes, you'll need to use unique characters.
// For the "char" (character) type, we put single characters
// in single quotes.
char names[] = { 'c', 'd', 'e', 'f', 'g', 'a', 'b', 'C' };
int frequencies[] = {262, 294, 330, 349, 392, 440, 494, 523};
// Now we'll search through the letters in the array, and if
// we find it, we'll return the frequency for that note.
for (i = 0; i < numNotes; i++) // Step through the notes
{
if (names[i] == note) // Is this the one?
{
return(frequencies[i]); // Yes! Return the frequency
}
}
return(0); // We looked through everything and didn't find it,
// but we still need to return a value, so return 0.
}

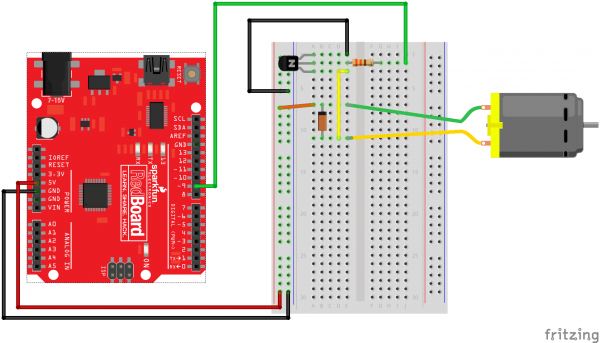
Task 12
// We'll be controlling the motor from pin 9.
// This must be one of the PWM-capable pins.
const int motorPin = 9;
const int sensorPin = 0;
void setup()
{
// Set up the motor pin to be an output:
pinMode(motorPin, OUTPUT);
// Set up the serial port:
Serial.begin(9600);
}
void loop()
{
// Here we've used comments to disable some of the examples.
// To try different things, uncomment one of the following lines
// and comment the other ones. See the functions below to learn
// what they do and how they work.
// motorOnThenOff();
// motorOnThenOffWithSpeed();
// motorAcceleration();
//serialSpeed();
potentiometerControl();
}
void potentiometerControl() //uses a potentiometer to control the speed of the motor
{
int sensorValue = analogRead(sensorPin)
analogWrite(motorPin, sensorValue);
}
// This function turns the motor on and off like the blinking LED.
// Try different values to affect the timing.
void motorOnThenOff()
{
int onTime = 3000; // milliseconds to turn the motor on
int offTime = 3000; // milliseconds to turn the motor off
digitalWrite(motorPin, HIGH); // turn the motor on (full speed)
delay(onTime); // delay for onTime milliseconds
digitalWrite(motorPin, LOW); // turn the motor off
delay(offTime); // delay for offTime milliseconds
}
// This function alternates between two speeds.
// Try different values to affect the timing and speed.
void motorOnThenOffWithSpeed()
{
int Speed1 = 200; // between 0 (stopped) and 255 (full speed)
int Time1 = 3000; // milliseconds for speed 1
int Speed2 = 50; // between 0 (stopped) and 255 (full speed)
int Time2 = 3000; // milliseconds to turn the motor off
analogWrite(motorPin, Speed1); // turns the motor On
delay(Time1); // delay for onTime milliseconds
analogWrite(motorPin, Speed2); // turns the motor Off
delay(Time2); // delay for offTime milliseconds
}
// This function slowly accelerates the motor to full speed,
// then back down to zero.
void motorAcceleration()
{
int speed;
int delayTime = 20; // milliseconds between each speed step
// accelerate the motor
for(speed = 0; speed <= 255; speed++)
{
analogWrite(motorPin,speed); // set the new speed
delay(delayTime); // delay between speed steps
}
// decelerate the motor
for(speed = 255; speed >= 0; speed--)
{
analogWrite(motorPin,speed); // set the new speed
delay(delayTime); // delay between speed steps
}
}
// This function will let you type a speed into the serial
// monitor window. Open the serial monitor using the magnifying-
// glass icon at the top right of the Arduino window. Then
// type your desired speed into the small text entry bar at the
// top of the window and click "Send" or press return. The motor
// will then operate at that speed. The valid range is 0 to 255.
void serialSpeed()
{
int speed;
Serial.println("Type a speed (0-255) into the box above,");
Serial.println("then click [send] or press [return]");
Serial.println(); // Print a blank line
// In order to type out the above message only once,
// we'll run the rest of this function in an infinite loop:
while(true) // "true" is always true, so this will loop forever.
{
// First we check to see if incoming data is available:
while (Serial.available() > 0)
{
// If it is, we'll use parseInt() to pull out any numbers:
speed = Serial.parseInt();
// Because analogWrite() only works with numbers from
// 0 to 255, we'll be sure the input is in that range:
speed = constrain(speed, 0, 255);
// We'll print out a message to let you know that the
// number was received:
Serial.print("Setting speed to ");
Serial.println(speed);
// And finally, we'll set the speed of the motor!
analogWrite(motorPin, speed);
}
}
}

Task 13
const int relayPin = 2; // use this pin to drive the transistorconst int timeDelay = 2000; // delay in ms for on and off phases, new time of 2 seconds
// You can make timeDelay shorter, but note that relays, being
// mechanical devices, will wear out quickly if you try to drive
// them too fast.
void setup()
{
pinMode(relayPin, OUTPUT); // set pin as an output
}
void loop()
{
digitalWrite(relayPin, HIGH); // turn the relay on
delay(timeDelay); // wait for one second
digitalWrite(relayPin, LOW); // turn the relay off
delay(timeDelay); // wait for one second
}


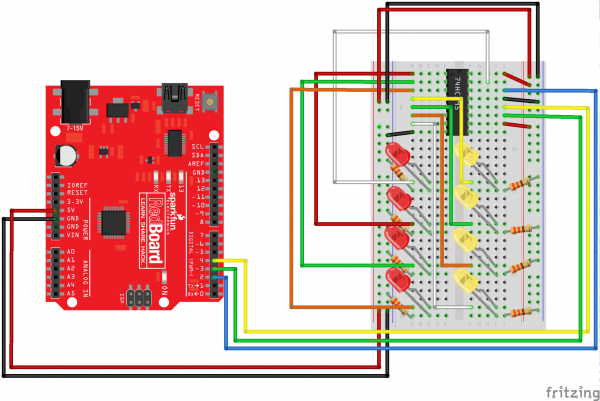
Task 14
// Pin definitions:
// The 74HC595 uses a type of serial connection called SPI
// (Serial Peripheral Interface) that requires three pins:
int datapin = 2;
int clockpin = 3;
int latchpin = 4;
// We'll also declare a global variable for the data we're
// sending to the shift register:
byte data = 0;
void setup()
{
// Set the three SPI pins to be outputs:
pinMode(datapin, OUTPUT);
pinMode(clockpin, OUTPUT);
pinMode(latchpin, OUTPUT);
}
void loop()
{
// We're going to use the same functions we played with back
// in circuit 04, "Multiple LEDs", we've just replaced
// digitalWrite() with a new function called shiftWrite()
// (see below). We also have a new function that demonstrates
// binary counting.
// To try the different functions below, uncomment the one
// you want to run, and comment out the remaining ones to
// disable them from running.
oneAfterAnother(); // All on, all off
//oneOnAtATime(); // Scroll down the line
//pingPong(); // Like above, but back and forth
//randomLED(); // Blink random LEDs
//marquee();
//binaryCount(); // Bit patterns from 0 to 255
}
void shiftWrite(int desiredPin, boolean desiredState)
// This function lets you make the shift register outputs
// HIGH or LOW in exactly the same way that you use digitalWrite().
// Like digitalWrite(), this function takes two parameters:
// "desiredPin" is the shift register output pin
// you want to affect (0-7)
// "desiredState" is whether you want that output
// to be HIGH or LOW
// Inside the Arduino, numbers are stored as arrays of "bits",
// each of which is a single 1 or 0 value. Because a "byte" type
// is also eight bits, we'll use a byte (which we named "data"
// at the top of this sketch) to send data to the shift register.
// If a bit in the byte is "1", the output will be HIGH. If the bit
// is "0", the output will be LOW.
// To turn the individual bits in "data" on and off, we'll use
// a new Arduino commands called bitWrite(), which can make
// individual bits in a number 1 or 0.
{
// First we'll alter the global variable "data", changing the
// desired bit to 1 or 0:
bitWrite(data,desiredPin,desiredState);
// Now we'll actually send that data to the shift register.
// The shiftOut() function does all the hard work of
// manipulating the data and clock pins to move the data
// into the shift register:
shiftOut(datapin, clockpin, MSBFIRST, data);
// Once the data is in the shift register, we still need to
// make it appear at the outputs. We'll toggle the state of
// the latchPin, which will signal the shift register to "latch"
// the data to the outputs. (Latch activates on the high-to
// -low transition).
digitalWrite(latchpin, HIGH);
digitalWrite(latchpin, LOW);
}
/*
oneAfterAnother()
This function will light one LED, delay for delayTime, then light
the next LED, and repeat until all the LEDs are on. It will then
turn them off in the reverse order.
*/
void oneAfterAnother()
{
int index;
int delayTime = 100; // Time (milliseconds) to pause between LEDs
// Make this smaller for faster switching
// Turn all the LEDs on:
// This for() loop will step index from 0 to 7
// (putting "++" after a variable means add one to it)
// and will then use digitalWrite() to turn that LED on.
for(index = 0; index <= 7; index++)
{
shiftWrite(index, HIGH);
delay(delayTime);
}
// Turn all the LEDs off:
// This for() loop will step index from 7 to 0
// (putting "--" after a variable means subtract one from it)
// and will then use digitalWrite() to turn that LED off.
for(index = 7; index >= 0; index--)
{
shiftWrite(index, LOW);
delay(delayTime);
}
}
/*
oneOnAtATime()
This function will step through the LEDs, lighting one at at time.
*/
void oneOnAtATime()
{
int index;
int delayTime = 100; // Time (milliseconds) to pause between LEDs
// Make this smaller for faster switching
// step through the LEDs, from 0 to 7
for(index = 0; index <= 7; index++)
{
shiftWrite(index, HIGH); // turn LED on
delay(delayTime); // pause to slow down the sequence
shiftWrite(index, LOW); // turn LED off
}
}
/*
pingPong()
This function will step through the LEDs, lighting one at at time,
in both directions.
*/
void pingPong()
{
int index;
int delayTime = 100; // time (milliseconds) to pause between LEDs
// make this smaller for faster switching
//reversed the order the lights change in pingPong()
// step through the LEDs, from 7 to 0
for(index = 7; index >= 0; index--)
{
shiftWrite(index, HIGH); // turn LED on
delay(delayTime); // pause to slow down the sequence
shiftWrite(index, LOW); // turn LED off
}
// step through the LEDs, from 7 to 0
for(index = 0; index <= 7; index++)
{
shiftWrite(index, HIGH); // turn LED on
delay(delayTime); // pause to slow down the sequence
shiftWrite(index, LOW); // turn LED off
}
}
/*
randomLED()
This function will turn on random LEDs. Can you modify it so it
also lights them for random times?
*/
void randomLED()
{
int index;
int delayTime = 100; // time (milliseconds) to pause between LEDs
// make this smaller for faster switching
// The random() function will return a semi-random number each
// time it is called. See http://arduino.cc/en/Reference/Random
// for tips on how to make random() more random.
index = random(8); // pick a random number between 0 and 7
shiftWrite(index, HIGH); // turn LED on
delay(delayTime); // pause to slow down the sequence
shiftWrite(index, LOW); // turn LED off
}
/*
marquee()
This function will mimic "chase lights" like those around signs.
*/
void marquee()
{
int index;
int delayTime = 200; // Time (milliseconds) to pause between LEDs
// Make this smaller for faster switching
// Step through the first four LEDs
// (We'll light up one in the lower 4 and one in the upper 4)
for(index = 0; index <= 3; index++)
{
shiftWrite(index, HIGH); // Turn a LED on
shiftWrite(index+4, HIGH); // Skip four, and turn that LED on
delay(delayTime); // Pause to slow down the sequence
shiftWrite(index, LOW); // Turn both LEDs off
shiftWrite(index+4, LOW);
}
}
/*
binaryCount()
Numbers are stored internally in the Arduino as arrays of "bits",
each of which is a 1 or 0. Just like the base-10 numbers we use
every day, The position of the bit affects the magnitude of its
contribution to the total number:
Bit position Contribution
0 1
1 2
2 4
3 8
4 16
5 32
6 64
7 128
To build any number from 0 to 255 from the above 8 bits, just
select the contributions you need to make. The bits will then be
1 if you use that contribution, and 0 if you don't.
This function will increment the "data" variable from 0 to 255
and repeat. When we send this value to the shift register and LEDs,
you can see the on-off pattern of the eight bits that make up the
byte. See http://www.arduino.cc/playground/Code/BitMath for more
information on binary numbers.
*/
void binaryCount()
{
int delayTime = 1000; // time (milliseconds) to pause between LEDs
// make this smaller for faster switching
// Send the data byte to the shift register:
shiftOut(datapin, clockpin, MSBFIRST, data);
// Toggle the latch pin to make the data appear at the outputs:
digitalWrite(latchpin, HIGH);
digitalWrite(latchpin, LOW);
// Add one to data, and repeat!
// (Because a byte type can only store numbers from 0 to 255,
// if we add more than that, it will "roll around" back to 0
// and start over).
data++;
// Delay so you can see what's going on:
delay(delayTime);
}

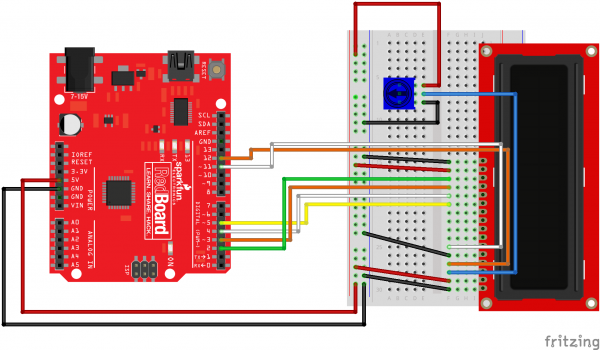
Task 15
// Load the LiquidCrystal library, which will give us
// commands to interface to the LCD:
#include <LiquidCrystal.h>
// Initialize the library with the pins we're using.
// (Note that you can use different pins if needed.)
// See http://arduino.cc/en/Reference/LiquidCrystal
// for more information:
LiquidCrystal lcd(12,11,5,4,3,2);
void setup()
{
// The LiquidCrystal library can be used with many different
// LCD sizes. We're using one that's 2 lines of 16 characters,
// so we'll inform the library of that:
lcd.begin(16, 2);
// Data sent to the display will stay there until it's
// overwritten or power is removed. This can be a problem
// when you upload a new sketch to the Arduino but old data
// remains on the display. Let's clear the LCD using the
// clear() command from the LiquidCrystal library:
lcd.clear();
// Now we'll display a message on the LCD!
// Just as with the Arduino IDE, there's a cursor that
// determines where the data you type will appear. By default,
// this cursor is invisible, though you can make it visible
// with other library commands if you wish.
// When the display powers up, the invisible cursor starts
// on the top row and first column.
lcd.print("Sup, fool!");
// Adjusting the contrast (IMPORTANT!)
// When you run the sketch for the first time, there's a
// very good chance you won't see anything on the LCD display.
// This is because the contrast likely won't be set correctly.
// Don't worry, it's easy to set, and once you set it you won't
// need to change it again.
// Run the sketch, then turn the potentiometer until you can
// clearly see the "hello, world!" text. If you still can't
// see anything, check all of your connections, and ensure that
// the sketch was successfully uploaded to the Arduino.
}
void loop()
{
// You can move the invisible cursor to any location on the
// LCD before sending data. Counting starts from 0, so the top
// line is line 0 and the bottom line is line 1. Columns range
// from 0 on the left side, to 15 on the right.
// In additon to the "hello, world!" printed above, let's
// display a running count of the seconds since the Arduino
// was last reset. Note that the data you send to the display
// will stay there unless you erase it by overwriting it or
// sending a lcd.clear() command.
// Here we'll set the invisible cursor to the first column
// (column 0) of the second line (line 1):
lcd.setCursor(0,1);
// Now we'll print the number of (millis() / 100)
// since the Arduino last reset:
lcd.print(millis()/100);
// TIP: Since the numeric data we're sending is always growing
// in length, new values will always overwrite the previous ones.
// However, if you want to display varying or decreasing numbers
// like a countdown, you'll find that the display will leave
// "orphan" characters when the new value is shorter than the
// old one.
// To prevent this, you'll need to erase the old number before
// writing the new one. You can do this by overwriting the
// last number with spaces. If you erase the old number and
// immediately write the new one, the momentary erase won't
// be noticeable. Here's a typical sequence of code:
// lcd.setCursor(0,1); // Set the cursor to the position
// lcd.print(" "); // Erase the largest possible number
// lcd.setCursor(0,1); // Reset the cursor to the original position
// lcd.print(millis()/1000); // Print our value
// NEXT STEPS:
// Now you know the basics of hooking up an LCD to the Arduino,
// and sending text and numeric data to the display!
// The LCD library has many commands for turning the
// cursor on and off, scrolling the screen, etc. See:
// http://arduino.cc/en/Reference/LiquidCrystal
// for more information.
// Arduino also comes with a number of built-in examples
// showing off the features of the LiquidCrystal library.
// These are locted in the file/examples/LiquidCrystal menu.
// Have fun, and let us know what you create!
// Your friends at SparkFun.
}

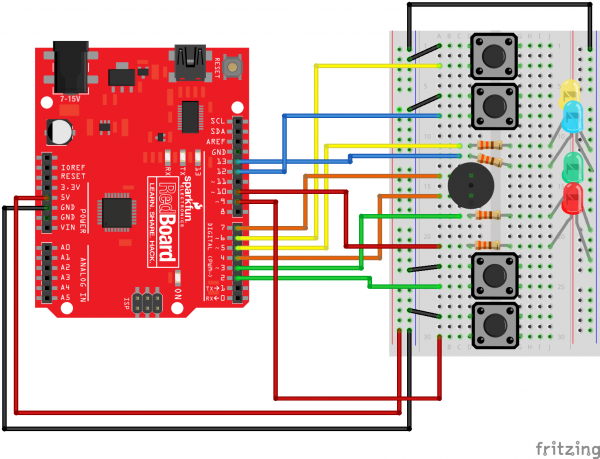
Task 16
/*************************************************
* Public Constants
*************************************************/
#define NOTE_B0 31
#define NOTE_C1 33
#define NOTE_CS1 35
#define NOTE_D1 37
#define NOTE_DS1 39
#define NOTE_E1 41
#define NOTE_F1 44
#define NOTE_FS1 46
#define NOTE_G1 49
#define NOTE_GS1 52
#define NOTE_A1 55
#define NOTE_AS1 58
#define NOTE_B1 62
#define NOTE_C2 65
#define NOTE_CS2 69
#define NOTE_D2 73
#define NOTE_DS2 78
#define NOTE_E2 82
#define NOTE_F2 87
#define NOTE_FS2 93
#define NOTE_G2 98
#define NOTE_GS2 104
#define NOTE_A2 110
#define NOTE_AS2 117
#define NOTE_B2 123
#define NOTE_C3 131
#define NOTE_CS3 139
#define NOTE_D3 147
#define NOTE_DS3 156
#define NOTE_E3 165
#define NOTE_F3 175
#define NOTE_FS3 185
#define NOTE_G3 196
#define NOTE_GS3 208
#define NOTE_A3 220
#define NOTE_AS3 233
#define NOTE_B3 247
#define NOTE_C4 262
#define NOTE_CS4 277
#define NOTE_D4 294
#define NOTE_DS4 311
#define NOTE_E4 330
#define NOTE_F4 349
#define NOTE_FS4 370
#define NOTE_G4 392
#define NOTE_GS4 415
#define NOTE_A4 440
#define NOTE_AS4 466
#define NOTE_B4 494
#define NOTE_C5 523
#define NOTE_CS5 554
#define NOTE_D5 587
#define NOTE_DS5 622
#define NOTE_E5 659
#define NOTE_F5 698
#define NOTE_FS5 740
#define NOTE_G5 784
#define NOTE_GS5 831
#define NOTE_A5 880
#define NOTE_AS5 932
#define NOTE_B5 988
#define NOTE_C6 1047
#define NOTE_CS6 1109
#define NOTE_D6 1175
#define NOTE_DS6 1245
#define NOTE_E6 1319
#define NOTE_F6 1397
#define NOTE_FS6 1480
#define NOTE_G6 1568
#define NOTE_GS6 1661
#define NOTE_A6 1760
#define NOTE_AS6 1865
#define NOTE_B6 1976
#define NOTE_C7 2093
#define NOTE_CS7 2217
#define NOTE_D7 2349
#define NOTE_DS7 2489
#define NOTE_E7 2637
#define NOTE_F7 2794
#define NOTE_FS7 2960
#define NOTE_G7 3136
#define NOTE_GS7 3322
#define NOTE_A7 3520
#define NOTE_AS7 3729
#define NOTE_B7 3951
#define NOTE_C8 4186
#define NOTE_CS8 4435
#define NOTE_D8 4699
#define NOTE_DS8 4978
#define CHOICE_OFF 0 //Used to control LEDs
#define CHOICE_NONE 0 //Used to check buttons
#define CHOICE_RED (1 << 0)
#define CHOICE_GREEN (1 << 1)
#define CHOICE_BLUE (1 << 2)
#define CHOICE_YELLOW (1 << 3)
#define LED_RED 10
#define LED_GREEN 3
#define LED_BLUE 13
#define LED_YELLOW 5
// Button pin definitions
#define BUTTON_RED 9
#define BUTTON_GREEN 2
#define BUTTON_BLUE 12
#define BUTTON_YELLOW 6
// Buzzer pin definitions
#define BUZZER1 4
#define BUZZER2 7
// Define game parameters
#define ROUNDS_TO_WIN 5 //Number of rounds to succesfully remember before you win. 13 is do-able. I thought 5 is more appropriate, especially for kids
#define ENTRY_TIME_LIMIT 5000//Amount of time to press a button before game times out. 3000ms = 3 sec. 5000 = 5 sec (more appropriate)
#define MODE_MEMORY 0
#define MODE_BATTLE 1
#define MODE_BEEGEES 2
// Game state variables
byte gameMode = MODE_MEMORY; //By default, let's play the memory game
byte gameBoard[32]; //Contains the combination of buttons as we advance
byte gameRound = 0; //Counts the number of succesful rounds the player has made it through
void setup()
{
//Setup hardware inputs/outputs. These pins are defined in the hardware_versions header file
//Enable pull ups on inputs
pinMode(BUTTON_RED, INPUT_PULLUP);
pinMode(BUTTON_GREEN, INPUT_PULLUP);
pinMode(BUTTON_BLUE, INPUT_PULLUP);
pinMode(BUTTON_YELLOW, INPUT_PULLUP);
pinMode(LED_RED, OUTPUT);
pinMode(LED_GREEN, OUTPUT);
pinMode(LED_BLUE, OUTPUT);
pinMode(LED_YELLOW, OUTPUT);
pinMode(BUZZER1, OUTPUT);
pinMode(BUZZER2, OUTPUT);
//Mode checking
gameMode = MODE_MEMORY; // By default, we're going to play the memory game
// Check to see if the lower right button is pressed
if (checkButton() == CHOICE_YELLOW) play_beegees();
// Check to see if upper right button is pressed
if (checkButton() == CHOICE_GREEN)
{
gameMode = MODE_BATTLE; //Put game into battle mode
//Turn on the upper right (green) LED
setLEDs(CHOICE_GREEN);
toner(CHOICE_GREEN, 150);
setLEDs(CHOICE_RED | CHOICE_BLUE | CHOICE_YELLOW); // Turn on the other LEDs until you release button
while(checkButton() != CHOICE_NONE) ; // Wait for user to stop pressing button
//Now do nothing. Battle mode will be serviced in the main routine
}
play_winner(); // After setup is complete, say hello to the world
}
void loop()
{
attractMode(); // Blink lights while waiting for user to press a button
// Indicate the start of game play
setLEDs(CHOICE_RED | CHOICE_GREEN | CHOICE_BLUE | CHOICE_YELLOW); // Turn all LEDs on
delay(1000);
setLEDs(CHOICE_OFF); // Turn off LEDs
delay(250);
if (gameMode == MODE_MEMORY)
{
// Play memory game and handle result
if (play_memory() == true)
play_winner(); // Player won, play winner tones
else
play_loser(); // Player lost, play loser tones
}
if (gameMode == MODE_BATTLE)
{
play_battle(); // Play game until someone loses
play_loser(); // Player lost, play loser tones
}
}
//-=-=-=-=-=-=-=-=-=-=-=-=-=-=-=-=-=-=-=-=-=-=-=-=-=-=-=-=-=-=
//The following functions are related to game play only
// Play the regular memory game
// Returns 0 if player loses, or 1 if player wins
boolean play_memory(void)
{
randomSeed(millis()); // Seed the random generator with random amount of millis()
gameRound = 0; // Reset the game to the beginning
while (gameRound < ROUNDS_TO_WIN)
{
add_to_moves(); // Add a button to the current moves, then play them back
playMoves(); // Play back the current game board
// Then require the player to repeat the sequence.
for (byte currentMove = 0 ; currentMove < gameRound ; currentMove++)
{
byte choice = wait_for_button(); // See what button the user presses
if (choice == 0) return false; // If wait timed out, player loses
if (choice != gameBoard[currentMove]) return false; // If the choice is incorect, player loses
}
delay(1000); // Player was correct, delay before playing moves
}
return true; // Player made it through all the rounds to win!
}
// Play the special 2 player battle mode
// A player begins by pressing a button then handing it to the other player
// That player repeats the button and adds one, then passes back.
// This function returns when someone loses
boolean play_battle(void)
{
gameRound = 0; // Reset the game frame back to one frame
while (1) // Loop until someone fails
{
byte newButton = wait_for_button(); // Wait for user to input next move
gameBoard[gameRound++] = newButton; // Add this new button to the game array
// Then require the player to repeat the sequence.
for (byte currentMove = 0 ; currentMove < gameRound ; currentMove++)
{
byte choice = wait_for_button();
if (choice == 0) return false; // If wait timed out, player loses.
if (choice != gameBoard[currentMove]) return false; // If the choice is incorect, player loses.
}
delay(100); // Give the user an extra 100ms to hand the game to the other player
}
return true; // We should never get here
}
// Plays the current contents of the game moves
void playMoves(void)
{
for (byte currentMove = 0 ; currentMove < gameRound ; currentMove++)
{
toner(gameBoard[currentMove], 150);
// Wait some amount of time between button playback
// Shorten this to make game harder
delay(150); // 150 works well. 75 gets fast.
}
}
// Adds a new random button to the game sequence, by sampling the timer
void add_to_moves(void)
{
byte newButton = random(0, 4); //min (included), max (exluded)
// We have to convert this number, 0 to 3, to CHOICEs
if(newButton == 0) newButton = CHOICE_RED;
else if(newButton == 1) newButton = CHOICE_GREEN;
else if(newButton == 2) newButton = CHOICE_BLUE;
else if(newButton == 3) newButton = CHOICE_YELLOW;
gameBoard[gameRound++] = newButton; // Add this new button to the game array
}
//-=-=-=-=-=-=-=-=-=-=-=-=-=-=-=-=-=-=-=-=-=-=-=-=-=-=-=-=-=-=
//The following functions control the hardware
// Lights a given LEDs
// Pass in a byte that is made up from CHOICE_RED, CHOICE_YELLOW, etc
void setLEDs(byte leds)
{
if ((leds & CHOICE_RED) != 0)
digitalWrite(LED_RED, HIGH);
else
digitalWrite(LED_RED, LOW);
if ((leds & CHOICE_GREEN) != 0)
digitalWrite(LED_GREEN, HIGH);
else
digitalWrite(LED_GREEN, LOW);
if ((leds & CHOICE_BLUE) != 0)
digitalWrite(LED_BLUE, HIGH);
else
digitalWrite(LED_BLUE, LOW);
if ((leds & CHOICE_YELLOW) != 0)
digitalWrite(LED_YELLOW, HIGH);
else
digitalWrite(LED_YELLOW, LOW);
}
// Wait for a button to be pressed.
// Returns one of LED colors (LED_RED, etc.) if successful, 0 if timed out
byte wait_for_button(void)
{
long startTime = millis(); // Remember the time we started the this loop
while ( (millis() - startTime) < ENTRY_TIME_LIMIT) // Loop until too much time has passed
{
byte button = checkButton();
if (button != CHOICE_NONE)
{
toner(button, 150); // Play the button the user just pressed
while(checkButton() != CHOICE_NONE) ; // Now let's wait for user to release button
delay(10); // This helps with debouncing and accidental double taps
return button;
}
}
return CHOICE_NONE; // If we get here, we've timed out!
}
// Returns a '1' bit in the position corresponding to CHOICE_RED, CHOICE_GREEN, etc.
byte checkButton(void)
{
if (digitalRead(BUTTON_RED) == 0) return(CHOICE_RED);
else if (digitalRead(BUTTON_GREEN) == 0) return(CHOICE_GREEN);
else if (digitalRead(BUTTON_BLUE) == 0) return(CHOICE_BLUE);
else if (digitalRead(BUTTON_YELLOW) == 0) return(CHOICE_YELLOW);
return(CHOICE_NONE); // If no button is pressed, return none
}
// Light an LED and play tone
// Red, upper left: 440Hz - 2.272ms - 1.136ms pulse
// Green, upper right: 880Hz - 1.136ms - 0.568ms pulse
// Blue, lower left: 587.33Hz - 1.702ms - 0.851ms pulse
// Yellow, lower right: 784Hz - 1.276ms - 0.638ms pulse
void toner(byte which, int buzz_length_ms)
{
setLEDs(which); //Turn on a given LED
//Play the sound associated with the given LED
switch(which)
{
case CHOICE_RED:
buzz_sound(buzz_length_ms, 1136);
break;
case CHOICE_GREEN:
buzz_sound(buzz_length_ms, 568);
break;
case CHOICE_BLUE:
buzz_sound(buzz_length_ms, 851);
break;
case CHOICE_YELLOW:
buzz_sound(buzz_length_ms, 638);
break;
}
setLEDs(CHOICE_OFF); // Turn off all LEDs
}
// Toggle buzzer every buzz_delay_us, for a duration of buzz_length_ms.
void buzz_sound(int buzz_length_ms, int buzz_delay_us)
{
// Convert total play time from milliseconds to microseconds
long buzz_length_us = buzz_length_ms * (long)1000;
// Loop until the remaining play time is less than a single buzz_delay_us
while (buzz_length_us > (buzz_delay_us * 2))
{
buzz_length_us -= buzz_delay_us * 2; //Decrease the remaining play time
// Toggle the buzzer at various speeds
digitalWrite(BUZZER1, LOW);
digitalWrite(BUZZER2, HIGH);
delayMicroseconds(buzz_delay_us);
digitalWrite(BUZZER1, HIGH);
digitalWrite(BUZZER2, LOW);
delayMicroseconds(buzz_delay_us);
}
}
// Play the winner sound and lights
void play_winner(void)
{
setLEDs(CHOICE_GREEN | CHOICE_BLUE);
winner_sound();
setLEDs(CHOICE_RED | CHOICE_YELLOW);
winner_sound();
setLEDs(CHOICE_GREEN | CHOICE_BLUE);
winner_sound();
setLEDs(CHOICE_RED | CHOICE_YELLOW);
winner_sound();
}
// Play the winner sound
// This is just a unique (annoying) sound we came up with, there is no magic to it
void winner_sound(void)
{
// Toggle the buzzer at various speeds
for (byte x = 250 ; x > 70 ; x--)
{
for (byte y = 0 ; y < 3 ; y++)
{
digitalWrite(BUZZER2, HIGH);
digitalWrite(BUZZER1, LOW);
delayMicroseconds(x);
digitalWrite(BUZZER2, LOW);
digitalWrite(BUZZER1, HIGH);
delayMicroseconds(x);
}
}
}
// Play the loser sound/lights
void play_loser(void)
{
setLEDs(CHOICE_RED | CHOICE_GREEN);
buzz_sound(255, 1500);
setLEDs(CHOICE_BLUE | CHOICE_YELLOW);
buzz_sound(255, 1500);
setLEDs(CHOICE_RED | CHOICE_GREEN);
buzz_sound(255, 1500);
setLEDs(CHOICE_BLUE | CHOICE_YELLOW);
buzz_sound(255, 1500);
}
// Show an "attract mode" display while waiting for user to press button.
void attractMode(void)
{
while(1)
{
setLEDs(CHOICE_RED);
delay(100);
if (checkButton() != CHOICE_NONE) return;
setLEDs(CHOICE_BLUE);
delay(100);
if (checkButton() != CHOICE_NONE) return;
setLEDs(CHOICE_GREEN);
delay(100);
if (checkButton() != CHOICE_NONE) return;
setLEDs(CHOICE_YELLOW);
delay(100);
if (checkButton() != CHOICE_NONE) return;
}
}
//-=-=-=-=-=-=-=-=-=-=-=-=-=-=-=-=-=-=-=-=-=-=-=-=-=-=-=-=-=-=
// The following functions are related to Beegees Easter Egg only
// Notes in the melody. Each note is about an 1/8th note, "0"s are rests.
int melody[] = {
NOTE_G4, NOTE_A4, 0, NOTE_C5, 0, 0, NOTE_G4, 0, 0, 0,
NOTE_E4, 0, NOTE_D4, NOTE_E4, NOTE_G4, 0,
NOTE_D4, NOTE_E4, 0, NOTE_G4, 0, 0,
NOTE_D4, 0, NOTE_E4, 0, NOTE_G4, 0, NOTE_A4, 0, NOTE_C5, 0};
int noteDuration = 115; // This essentially sets the tempo, 115 is just about right for a disco groove :)
int LEDnumber = 0; // Keeps track of which LED we are on during the beegees loop
// Do nothing but play bad beegees music
// This function is activated when user holds bottom right button during power up
void play_beegees()
{
//Turn on the bottom right (yellow) LED
setLEDs(CHOICE_YELLOW);
toner(CHOICE_YELLOW, 150);
setLEDs(CHOICE_RED | CHOICE_GREEN | CHOICE_BLUE); // Turn on the other LEDs until you release button
while(checkButton() != CHOICE_NONE) ; // Wait for user to stop pressing button
setLEDs(CHOICE_NONE); // Turn off LEDs
delay(1000); // Wait a second before playing song
digitalWrite(BUZZER1, LOW); // setup the "BUZZER1" side of the buzzer to stay low, while we play the tone on the other pin.
while(checkButton() == CHOICE_NONE) //Play song until you press a button
{
// iterate over the notes of the melody:
for (int thisNote = 0; thisNote < 32; thisNote++) {
changeLED();
tone(BUZZER2, melody[thisNote],noteDuration);
// to distinguish the notes, set a minimum time between them.
// the note's duration + 30% seems to work well:
int pauseBetweenNotes = noteDuration * 1.30;
delay(pauseBetweenNotes);
// stop the tone playing:
noTone(BUZZER2);
}
}
}
// Each time this function is called the board moves to the next LED
void changeLED(void)
{
setLEDs(1 << LEDnumber); // Change the LED
LEDnumber++; // Goto the next LED
if(LEDnumber > 3) LEDnumber = 0; // Wrap the counter if needed
}